

Slow and easy soft wholemeal rolls
So GBBO is back on our screens tonight and I’m completely over-excited! I LOVE baking (and watching other people baking) and I particularly love making bread, don’t you? It’s the ultimate slow food. I do feel that I’m rather chained to the internet, what with blogging and writing and, well, Instagramming and stuff (I know, it’s totally my own doing), so sometimes it’s just nice to switch off and have a lovely potter in the kitchen. Bread baking can’t be rushed and it forces you to relax and gives you plenty of head clearing time. These easy soft wholemeal rolls are based on my ‘quick and easy soft bread rolls’ recipe, published back in 2010 and since archived. I often get lovely emails from people asking where they went, and keep meaning to update the recipe (and the horrific photography - and the dodgy title - I prefer slow bread to quick bread!) so I made a batch yesterday and feel rather chuffed to be able to have one topped with smashed avo and a poached egg for my breakfast today!
The boys are basically just massive gannets, and when they come in at stupid o’clock all through the summer, I tend to leave something easy in the fridge for them, like cooked chicken breasts, salad, and a pile of these in the bread bin, so they can knock up something quick and healthy (ish). I’ve updated them with some strong wholemeal bread flour, but of course feel free to use strong white if you’d rather, or indeed experiment with rye or whatever you fancy. The result should still be good. If you’re looking for gorgeous bakeware, by the way, look no further than the Paul Hollywood collection at John Lewis - I’ve mentioned them before but check out the baking tins in particular - really sturdy and in a really unusual champagne colour too. I love them.
Slow and easy soft wholemeal rolls
450g strong wholemeal bread flour
2 tsp salt
1 x 7g sachet fast action dried yeast
300 ml milk
50g butter
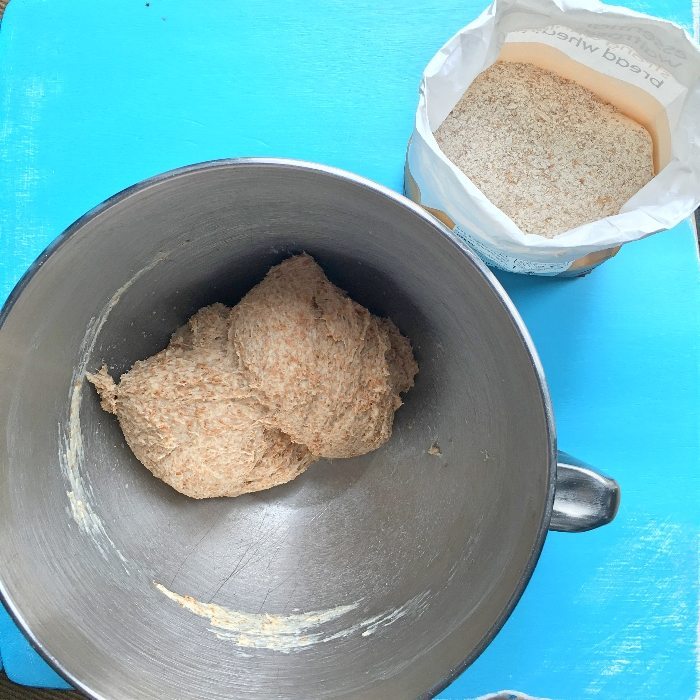
So first, sieve the flour into a large bowl (or your food mixer bowl), then stir in the salt and dried yeast.
In a small saucepan, warm the milk and butter over a low heat until the butter has just melted, then turn off the heat. The liquid should be at blood temperature when it’s added to the dry ingredients (which means you can stick your finger in without it feeling too warm). You can do this in the microwave, but remove it as soon as the butter starts to melt and stir gently until it’s all combined, otherwise you’ll be waiting for ages for it to be cool enough.
Making the dough:
Pour most of the milky mixture into the dry ingredients and stir it around with a knife until you get a light dough. Leave it as sticky as you can bear as you want your dough to be lovely and soft. You can always add a bit of flour if you really want to, but seriously, the stickier you can manage, the better.
If you have a tiny bit of liquid left over, that’s fine – you can brush it over the rolls before they go in the oven.
Now start kneading. If you’re using a food mixer, just bung it in for about five minutes and forget about it (great if you’re busy and need to crack on), but by hand is lovely and satisfying too – if I’ve got extra time I often do.
To hand knead:
I guess everyone finds their perfect technique, but I tend to hold the dough with one hand, then press and splurge the dough away from me with heel of the other hand (imagine you’re smearing it across the work surface) then bring it back, squish it into a ball again, turn it over and then splurge it again. As it’s quite a wet dough this is a bit messy, but that all adds to the fun. Again, if you’re getting really messy, you can always add a bit of extra flour. As you knead it, it will become more elastic and springy and less squelchy.
Double proving and shaping:
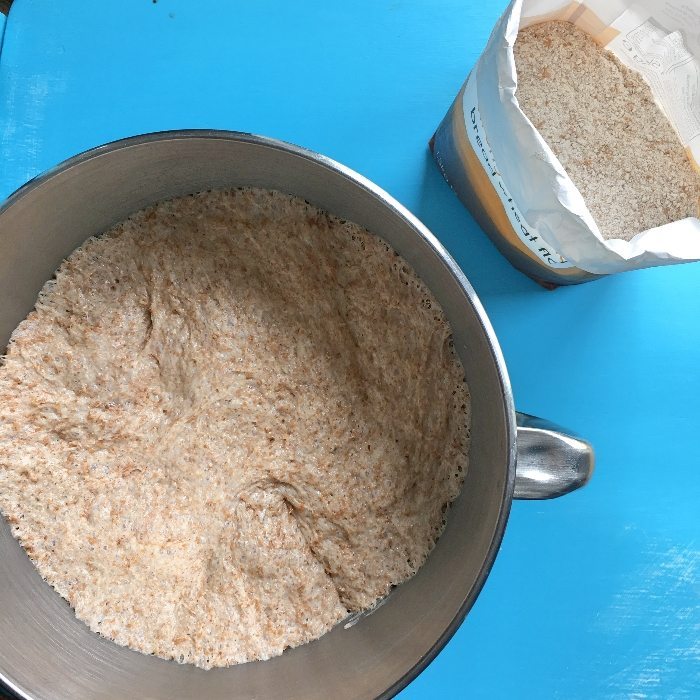
So when you’ve kneaded for about 7-10 minutes and your dough is springy and pillowy-soft, cover it with clingfilm (or do as I do and pinch the shower hats from hotel rooms - they’re perfect) and leave it in the airing cupboard or somewhere else warm until it’s doubled in size. I’m deliberately not going to tell you a time here as I think it’s important to allow the dough to rise slowly and properly. Just check back occasionally until the dough is really nice and plump and puffed up. Here’s my dough before and after:
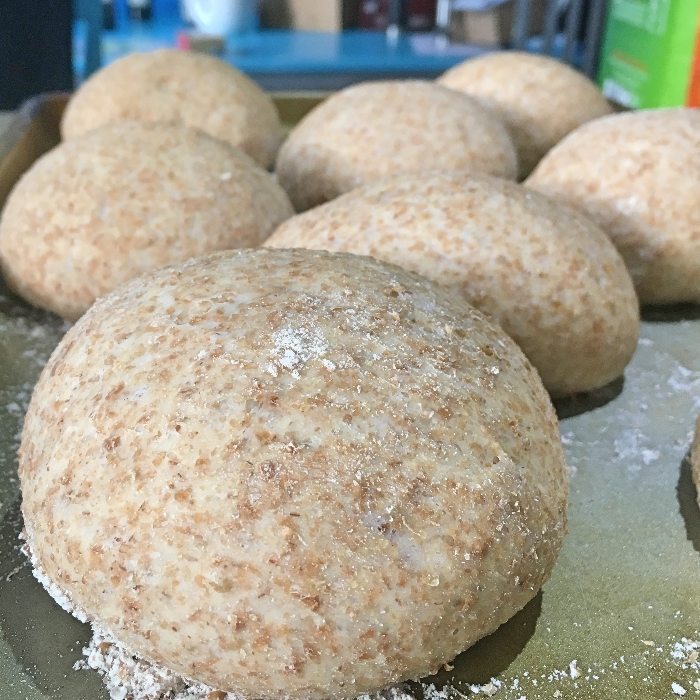
Then, just knock it back with your fist (good stress relief, this) and form it into 8 balls. Either place them on a baking tray or arrange them inside a springform cake tin like, then cover and rise again until they’re doubled in size again and look really smooth and plumped up. Again, here’s my before and after, below.
You can also just fashion the dough into an oval shaped loaf: cut it down the centre and bake it ‘free-form’. You get a nice crust by doing it this way.

Now set the oven to 180/gas 4 and bake for about 15-20 minutes (for rolls – a whole loaf will take a bit longer). You can glaze them if you like with a little leftover milky mixture, or if you want a lovely shiny finish, beat an egg and brush over the rolls. They’re done when they’re golden brown and you hear a hollow knock when you tap the loaf/rolls on the bottom.
You can do tons with this dough: oil a baking tray then get your fingers in there and really squish it, then drizzle with olive oil and maybe dot some olives and rosemary about and you’ve got a lovely easy scented flat loaf (not foccacia obviously, but similar). Add seeds, use wholemeal flour… just experiment. And if you do, send me pics!


OMG, I’ve had so many failed attempts at all sorts of bread until now. I had resigned myself to leave it to others if this didn’t work but it did! Perfect rolls and a new found enthusiasm for baking bread, thank you!
YAYYYY! Mike, this makes me so happy, thank you so much for the lovely feedback xx
My first time baking bread a few days ago and they turned out amazing, thank you so much, I dont think Ill ever buy bread again and my fiancee loves them…making another batch now at her request…just hope I can keep getting yeast and flour…not easy in the current crisis
Hi Chris, that’s great to hear!
Hi!
Wanna try your recipe today and as I have some fresh yeast in my fridge was wondering if I could use it instead of the dry one and if yes what would change when I do the recipe?
Thank you!
Hi Mariana. It should be fine. If my memory serves me correctly, I think you have to double the quantity of fresh to dried yeast. Plus I think you have to dissolve the fresh yeast in the warm water and wait until it bubbles. Let me know how you get on! Becky x
Hi
First time I’ve done this but got up at 0400hrs this morning to bake the wholemeal
rolls and am now waiting for them to ‘rise again’ from the airing cupboard as entering
our last village show into which I am entering five items, the rolls being one of them.
Like to do them as fresh as possible and am trying not to fall asleep! Hope they turn
out alright and liked the photo of you and your family. Will let you know how I get
on OK? Have a good weekend.
Annabelle at Yapton
Hi Annabelle, wow, that’s devotion - getting up at 4am! Yes please, I’d love to know how they turn out x
Hi Well, I got a second for the rolls and they are very nice. Out of five entries
I got two Firsts and two Seconds so can’t grumble but I shall definitely make them again. Most wholemeal stuff thugh nice can go very dry or hard but these dont; thanks again and bye for now
Annabelle
Just made these and the are fab!
Thank you!
These turned out great! Thank you for the recipe…
Oh I’m so pleased! Thank you for letting me know 🙂
I’m am doing these this week at some point I will post the result ♥️
Ooh! Let me know how you get on x
Help… my rolls came out really dense and hard! I used a mix of wholemeal, spelt and gram flour, and let the dough rise for 1.5 hrs first , and 1 hr once in its 8 balls. After kneading it for about 8 minutes. Do you think it was the flour combo I used or should I have left it to rise for longer?
Hey lovely, ooh good question - maybe it was the gram flour, as that doesn’t have any gluten in it? Did it puff up when you left it to prove? x