Now that autumn’s here I’ll be very happy to move back towards comfort foods: soups, stews, pies.. all the things I missed all summer! I love a bit of experimentation in the kitchen and have been fiddling with this doughnut recipe. We love doughnuts, and I’ve made them before, but the deep frying is a pain and I’m a bit dangerous with hot oil, so I wanted to make some that you could fry in less oil, just in a frying pan. Now don’t get me wrong, these aren’t diet doughnuts or anything, you’ll still need a good 1/2 inch of oil in the pan, but it’s a lot better than dragging out your deep fat fryer or having bubbling saucepans of oil on the stove. Plus there’s no yeast, no kneading, no rising, and they still taste amazing.
You will need:
For frying:
A medium frying pan with about 1/2″ of oil in the bottom. I use rapeseed. I measured, and for my 10″ pan I used about 500ml.
Wet ingredients:
50g butter, melted
50g caster sugar
125ml milk
Squeeze of lemon
Dry ingredients:
160g plain flour
A pinch of salt
2 tsp baking powder
Sugar, for coating
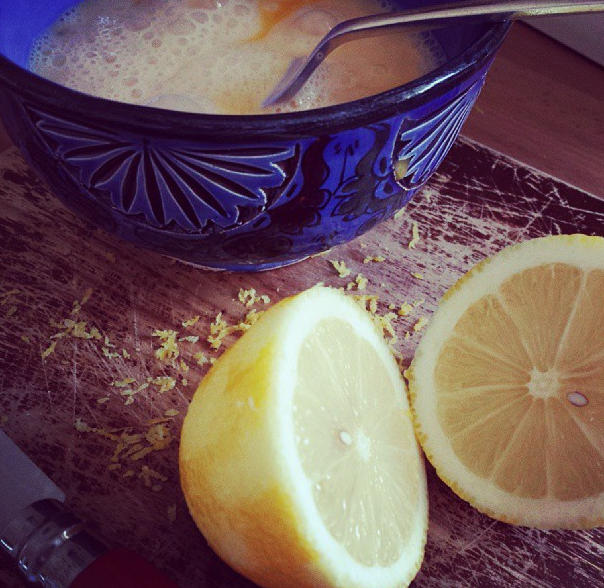
So firstly, get the oil heating up in the frying pan. Do it just on a medium heat so it heats slowly and safely. It needs to be about 180 degrees C so a thermometer will help here. I use a jam thermometer.
Measure out the butter and melt it in a jug in the microwave or in a saucepan. Add in the caster sugar, milk and lemon juice. It all curdles and looks hideous, but don’t worry. Don’t omit the lemon juice, it’s important.
Now, measure out all the dry ingredients and pour the wet into the dry, stirring briefly until you’ve got a soft dough. You might not need all the liquid. You need it just firm enough so that you can form them into small balls with your hands.
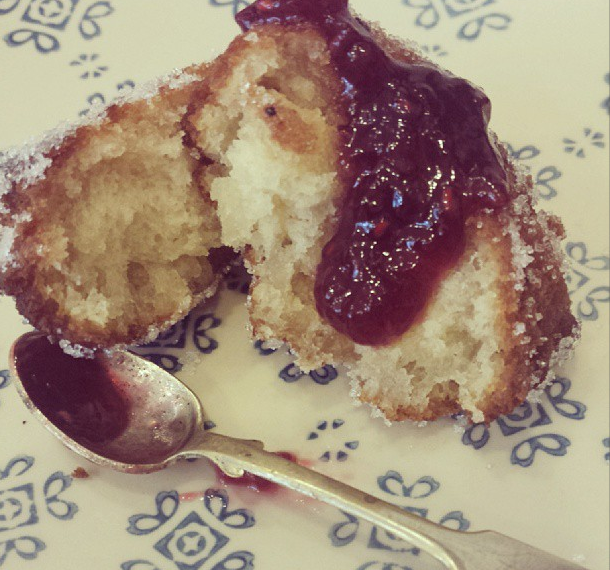
So when the oil is up to temperature, start forming the doughnuts into small balls (I used a smallish dessertspoonful per doughnut). Remember, you want them fluffy and light inside, so handle them really gently - just enough for form them into a ball - then straight (carefully) into the oil. When the undersides are golden brown, flip them over with some tongs and cook the other side. Lift them out and drain them briefly on some kitchen paper, then toss them while still warm in the sugar.
Serve them straight away while they’re still warm. Next thing I’m going to invest in is a cooking syringe so that I can put jam in the middle, but we just dunked them in the jam. Still fabulous.
Oh, and they won’t keep, but then I don’t think that will ever be a problem.
The lovely chaps at Waitrose are celebrating all things apple at the moment and sent me a surprise box of yummy Brilliantly British Estivale apples. Estivale are an eating apple, but still worked really well in this pie. If you use Bramleys they’ll obviously break down a bit more, but you’ll still get a great result:
For the caramel apple filling:
6 or 7 large British apples (about 1kg)
100g brown sugar
50ml water
25g butter
Peel, core and slice the apples (pop them in salted water until you’re ready to use them which will stop them going brown).
Melt the sugar, water and butter together in a large saucepan, then just add the apples and cook until just soft - about ten minutes. Remove from the heat and allow to cool. Meanwhile, make the pastry.
For the rough puff pastry:
You may think that life is too short to make puff pastry, but rough puff pastry, as its name suggests, isn’t one of those complicated things requiring rulers and setsquares, and mine is even more easy and rough and ready than most. Plus it’s so delicious and buttery and luxurious and actually pretty good fun to make too. I promise you’ll love it.
What you’ll need:
350g plain flour
pinch salt
250g cold butter
150ml iced water
As always with making pastry, the trick is to keep everything cold, hence the need to pop a couple of ice cubes into your jug of water.
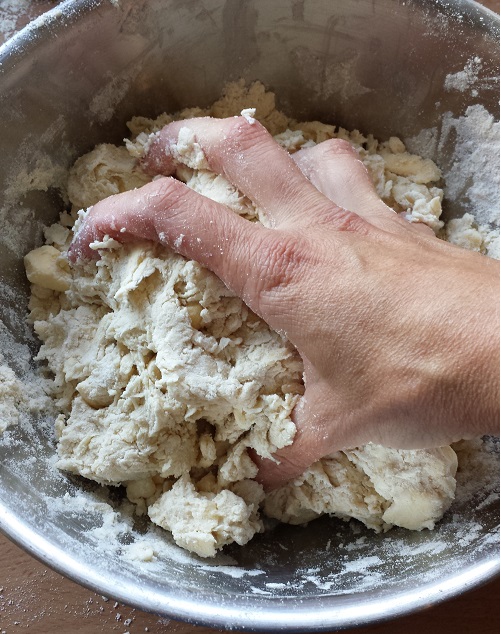
Measure the flour out into a large bowl and add the salt. Now, chop the butter into small squares - the smaller the better, and pop those into the flour.
Now, get your hands in there (wash them in cold water - every little helps) and just with your cool fingertips, lightly rub the butter lumps into the flour so that they’re pretty much separate. You don’t need to make crumble, just make sure every little lump is covered in flour (as you can also see, I’m pretty slap dash at this bit, but it doesn’t matter):
Rub the butter roughly into the flour
Now, add in the cold water and stir around a bit, then unleash The Claw: get your hand in and start gently bringing it all together until you can tip it out onto a floured work surface:
Unleash The Claw
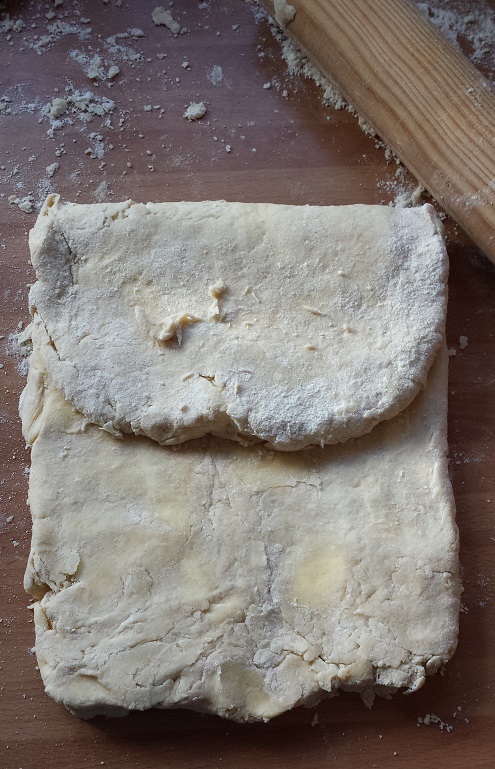
Squish it roughly into a rectangle, pressing the edges in, then roll it out into a larger rectangle. Now, fold the top third of the pastry down, and the bottom third up over the top of it:
Fold the top third down and the bottom third up
Now give it one turn, just 90 degrees, and do it again… roll it out into a rectangle, then flap the top third down and the bottom third up - see how you’re making flaky buttery layers?
Rotate and do it again
Do that two or three times (that’s usually all I can be bothered to do), then pop it into the fridge to chill for 20 minutes or so, letting it relax is quite important.
Split the dough into two: one third for the lid and two thirds for the base. Roll out the base pastry and line a baking dish. Pop this back into the fridge just while the apple mixture is cooling. If you put hot apple into it, it will start to melt the butter and make it go soft.
Once the apple is cool, spoon into the prepared pastry dish, roll out the lid, pop it on top and crimp around the edges. Brush the top with beaten egg and sprinkle with sugar. Bake for 20-25 minutes at gas 6/200 degrees until golden.
If you’re cooking individual mince or fruit pies, it should take about 15 mins at gas 6/200 degrees.
I was pretty pleased with the result. The pastry was nice and light and crumbly. Okay, not perfect, layered puff pastry, not brilliant crimping, possibly a bit soggy on the bottom… but hey, if you want perfect, you can buy one in a supermarket, and where’s the fun in that? Where’s the ‘TA DA!’ moment when you plonk this on the table in front of your family?! This is home baking. Bake the ones you love a pie. An imperfect, rough puff pie. They’ll love you for it.
Waitrose are running a competition on the Waitrose Facebook page to find your best apple recipes. The winner will have their apple creation featured on Waitrose.com and have the recipe mentioned in their weekly in-store Waitrose Weekend magazine. They’ll also win £500 Waitrose vouchers. Click here to find out more!
It’s not uncommon for kids to keep their rooms looking a bit childish as they grow up. The fact is, we spend our childhoods gradually designing our rooms, and eventually they’re just the way we like them - perfectly comfortable. Then, once we age up a bit, there’s simply no reason to change things, and for that reason some teenagers end up with themed bedspreads, playful wallpaper, and other childish features!
Now, there’s nothing wrong with this of course - a bedroom is a personal place, and it’s perfectly understandable for it to reflect childhood. But at the same time, it can be a lovely gesture from a parent to offer help with “updating” the bedroom to better suit the teenage years. So with that in mind, here are 5 ways you can bring your son or daughter’s bedroom from childhood to young adulthood.
1. Install A Desk
Teenagers will be facing more schoolwork, and many will appreciate a designated space for work. For that reason, organizing a space in the room for a nice desk can be a fantastic step to take. Visit Desk Warehouse for a wide variety of options, small and large, and choose a desk that will fit naturally into your son or daughter’s room.
2. Visual Makeover
This isn’t always necessary, but if your child has grown up with childlike wallpaper or brightly coloured walls and would prefer something a bit more grown up, you can oblige fairly easily. The truth is, wallpaper can be installed in a weekend, and a paint job in a bedroom can take just one day! Let your child pick out a new colour scheme in the spirit of updating the room.
3. Buy A New Bed
Another common aspect of children’s rooms is that they have small, simple, and often themed bed frames, with very basic mattresses. Kids like their sleep, but they don’t really realize it yet, so for the most part, any bed will do. But teenagers will start to appreciate their sleep a bit more (and will need good rest entering high school), so an upgraded bed can be strategic. I found a great transitional beds at DreamsUK. Storage highsleeper beds like the Melissa & Tyler pieces offer storage and a clean workspace below. If your tween wants something more “grown up”, there are several traditional style beds that offer hidden storage beneath the mattress.
4. Consider TV
Many parents dislike the idea of allowing their children to have TV in the bedroom, and it can certainly be a distraction. However, this step isn’t so much about offering your child a distraction as letting him or her have personal space. Consider allowing your child the freedom to watch TV in bed, or in his or her room, and if it becomes a problem you can always impose limits later.
5. Upgrade Furniture
Just as you can install a desk and upgrade a bed, other furniture can also be made more “adult.” It might mean putting in a larger, better bookcase, replacing a beanbag chair with an actual cushioned chair, etc. Make the complimentary features in your teen’s room suitable for a growing child, rather than a young one.
A while ago, the very lovely chaps at Tassimo sent us one of their machines. I don’t know if you know much about them, but it’s quite a nice looking machine into which you pop these little t-discs. As far as I can make out, the machine forces hot water through the ground coffee stored in the disc and then it drips into your mug. Kind of like a filter coffee machine, but no muss no fuss, no changing filters and messing around with coffee grounds.
The boys LOVE it. They love strong coffee so they use TWO espresso t-discs per cup and give themselves huge coffee buzzes and stand around talking about how much they love it…
BUT.
I don’t really like coffee.
Bless them, they’re loves at Tassimo. They don’t want me to be left out. They’ve persevered and persevered: would I like tea, for instance? English Breakfast perhaps? Green tea maybe? Twinings Chai Latte? Chai Latte Lemongrass even?
I like tea, but I can make it myself easily with a tea bag and the kettle.
I can’t help but feel left out of the Tassimo banter. WHAT’S IN IT FOR ME?! I want to shout.
This morning then, a new parcel greeted me. In it was Costa Cappuccino, one called ‘Expresso - intense flavour, fine and thick foam’ (YAY!, they all went) and Suchard Hot Chocolate. There was also a little thing talking about iced drinks. I thought I’d give it a go.
What a revelation.
If you make the Suchard Hot Chocolate in a normal cup, you can then pour it over ice. The iced chocolate is divine: I sat in the garden sipping it and thought ‘yep, this is me. I’ve found my drink’. A quick, paranoid check of the box confirmed that it’s not massively fattening (57 kcal per drink) and it’s rich and delicious without being overly milky or sweet (of course you can add milk and sugar if you want to).
I’ve found my drink. Excuse me while I do a little happy dance.
(By the way, if you like my little coffee glass, it’s this one here from Ozeri - very clever and double walled so you can put the ice straight in the then the chocolate all without breaking it).
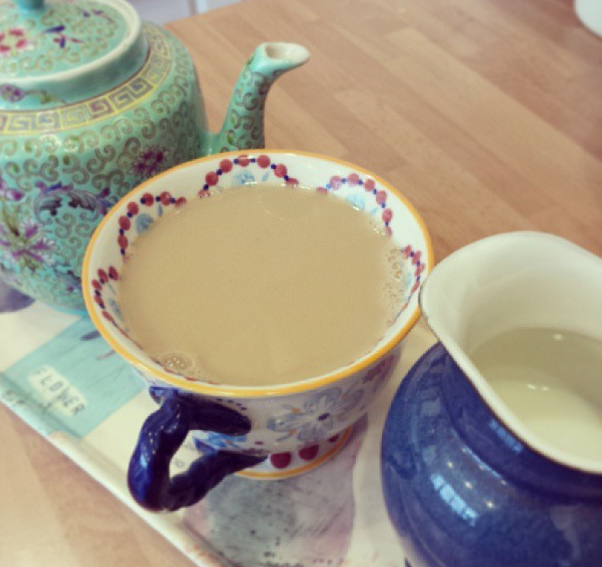
When I was in Edinburgh visiting Erica, one of our favourite places was the amazing Anthropologie in George Street. We loved all the beautiful tablewear and I especially loved how different patterns and shapes could look fabulous together.
I’ll be honest, this has started a little obsession with mismatched tableware. I already had my beloved teapot, but never really used it as I felt it didn’t go with anything else I had. Now, I’m using it with pride:
And I’ve also started to hunt around for more mismatched items to add to my collection. To keep it together, I make sure that everything I buy has at least a smidge of blue about it, but apart from that, anything goes!
On Saturday, imagine my delight when this little lot turned up from the wonderful chaps at DotComGiftShop:
They told me that I was one of their 20 fabulous family blogs (honoured!) and wanted to add to my mismatched tableware from their gorgeous Moorish Stoneware collection. And look how good their pretty Medina Blue Tile plate looks adorned with a hunk of jammy doughnut (recipe coming soon!):
…and look at this beautiful Cinnamon Flower dipping bowl - the perfect size for a duck egg!
I’m officially obsessed. Mr English sighed that sigh that says I foresee many hours spent tableware hunting in my future. He loves it really.
Sandwiches can be so boring! Lunchboxes are so dull. Packed lunches can be too predictable. How hard it is to make healthy and delicious sandwiches when it should be so simple…
It’s really easy to get into a rut with sandwiches. Many of us prepare them almost every day, and most of the time the same old fillings come out of the fridge – ham, cheese, lettuce, tomato. Dull, and actually not that healthy either! It’s the same with the bread, but trying to convince the kids that wholemeal is delicious is as difficult as any task. It has become easier as there are loads of different breads to choose from in your local supermarket, so don’t limit yourself to white sliced; why not try pittas or tortilla wraps for some alternatives that your children will adore?
A great way to add some interest is to create your own sandwich recipe mix – tuna, mayo, grated carrot and some chopped celery is a great combination, but remember to spread the bread with Flora Buttery or Original while making your sandwich. Not only does it have the benefit of sunflower goodness, but it also provides a useful barrier to stop the moisture soaking into the bread and making it soggy. No one likes a soggy sarnie!
Why limit yourself to squares or triangles? Get that cookie cutter out and make some fun shapes. It’s amazing how much more the kids will eat when it’s cut into manageable and bite-sized pieces. And interesting sandwiches and bento boxes are all the rage, too. Make them the envy of their classmates by creating some different sandwich designs and using sandwich recipes that are just that little bit different. It’s not as time consuming as you’d think! The kids also enjoy helping with this and can get quite creative- although we’d suggest that getting artistic with sandwiches remains a weekend activity or they’ll be late for school!
For more grownup sandwich inspiration, add some relishes and pickles and experiment with different meats and cheeses. Why not pile it high and make your own deli style sandwich? It’s a lot more fun than that old limp and uninspiring cheddar and ham combination.
If you’re looking for sandwich recipe inspiration, there are loads of fantastic healthy and delicious sandwich recipes at Flora.com, with great ideas on how to make the mundane so much more interesting.
As you probably know, we’re all serious chocoholics here at English Towers. Our latest obsession is the very peculiar range of Marvellous Creations bars (the Cola Pretzel Honeycomb one is ridiculously good). Imagine our delight, then, when a delivery of new Cadbury Dairy Milk Pebbles arrived on the doorstep! They’re yummy - think a combination of Cadbury Mini Eggs and Smarties (sorry, not Cadbury!) and you’re about there. But because they’re absolutely nothing to do with Easter you can eat them ALL YEAR ROUND! I’ve also recently seen glimpses of a special edition Winter Wonderland bar with milk and white chocolate trees. Yum.
To celebrate the launch of these delicious little beauties, I’m giving you the opportunity to win a family ticket to Cadbury World, PLUS Cadbury have very kindly offered to fund off peak rail travel for the lucky winner too! So even if you don’t live close, you can still experience the magical world of Cadbury!
All you have to do is leave a comment and tell me your favourite Cadbury product. I’ll even throw in a bag of new Dairy Milk Pebbles too. What are you waiting for?!
The Small Print
Usual English Mum competition rules apply. Competition ends Friday 27th September at midnight. UK only. Prize comprises: one family ticket to Cadbury World (two adults, two children), plus rail travel costs funded from the winner’s home mainline UK railway station to Bourneville Station only, and return - off peak. All other expenses to be covered by the competition winner. New comments will not show straight away as they require moderation.
** This competition is now closed. Congratulations to Kirsty Caffrey for winning the tickets and travel! **
The beautiful Disney Magic in port at Villefranche, France - ENGLISH MUM
So as you know, August was a busy one for me. First of all we whizzed around Britanny for two weeks in our lovely (borrowed) Honda CR-V, and then, with the most ridiculous timing known to man, we got home on the Friday night at 11pm and had to be at Heathrow at 5am the next morning to grab a flight to Barcelona to meet up with the Disney Magic, Disney’s wonderful cruise ship.
Our favourite sunbeds on the deck
Are we mental? Yes, possibly, but this was a trip that I just couldn’t miss. Let me explain: the Disney Magic was Disney’s first cruise ship and is thought of especially fondly by everyone who loves Disney cruising (and Disney in general). The boys and I were lucky to cruise around the Mediterranean, visiting Villefranche in France, La Spezia, Civitavecchia and Naples in Italy, before returning to Barcelona (more of all these amazing shore adventures later). Shortly after this, the Magic was heading to Cadiz to undergo a complete transformation under Disney’s incredibly talented team of ‘Imagineers’ (I love this name).
The Disney Magic is 15 years old. FIFTEEN! But obviously you’d never know it because nothing has ever been allowed to get old - there are no bits of bare carpet or faded curtains aboard a Disney ship - everything is monitored very carefully and has been kept pristine over the years, but still, fashions change, technology moves on, and Disney Cruise Line felt that the Magic deserved a flashy new makeover!
‘Jazz hands!’ Charlie meets Stitch
While we were on board, as well as getting the chance to visit Monaco, Rome and Pompeii, we had a once in a lifetime chance to spend time with lovely Frank De Heer, basically the ’Chief Imagineer’, but officially the Vice President of Disney Cruise Line Operations, and in charge of the Disney Magic’s incredible new look. We wandered corridors, looked at public areas, staterooms, restaurants and kids’ clubs, all the time listening to Frank telling us his grand plans for each area, getting all the insider info about how the ship is going to look, including exclusive peeks at the new designs. Here’s what I found out:
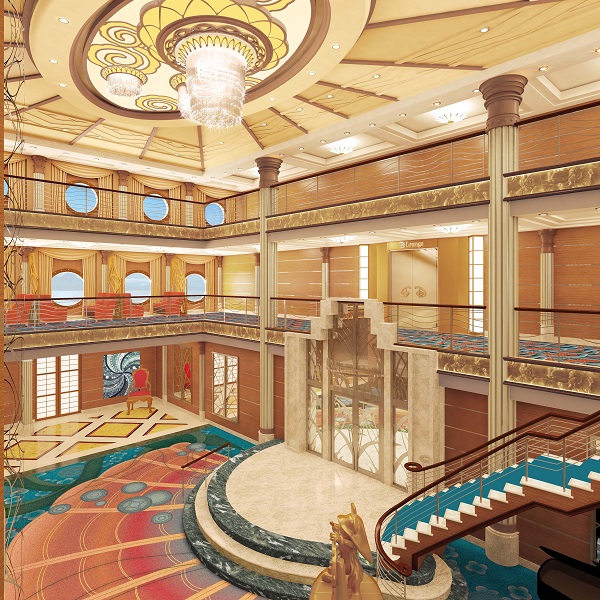
The Grand Atrium Lobby
This is the area where you first walk onto the ship (and where they introduce you and all the staff give you a round of applause, which always makes me cry). It’s going to be completely transformed into an elegant Art Deco wonder, inspired by the sea, with a gorgeous new chandelier, and opened out by losing one of the staircases, but the much-loved ‘Helmsman Mickey’ bronze statue will stay, receiving a buff and polish to give him back his shine!
How the new atrium lobby will look. Pic: (c) Disney Cruise Line
The pool areas and upper decks
We’ll be waving goodbye to the lovely Mickey pool (sniff), but the whole area is going to be reimagined, with a Huey, Dewey and Louie theme. There’ll be a fabulous new ”AquaDunk’ slide, which will take up three storeys of the deck and extend 20 feet out over the edge of the ship (and yup, you guessed it, it’s transparent!), and for the tiddlers, there’ll be an interactive water playground with jets, fountains and bubbly things galore, oh and a smaller slide called the ‘Twist’n'Spout’ so they don’t miss out!
The current children’s pool area - we’ll be waving goodbye to Mickey! - ENGLISH MUM
Here’s a sneaky peak at the new look ‘Aqua Lab’ (with kind permission of Disney Cruise Line):
The new Aqua Lab water playground. Pic (c) Disney Cruise Line
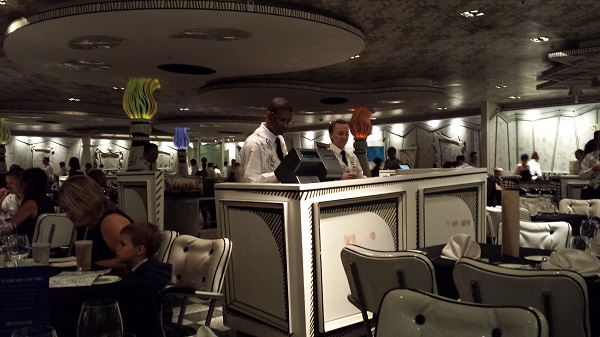
Restaurant areas
One of the things I loved about the whole project to reimagine the Disney Magic was that there was a sense of not fixing what isn’t broken. The Animator’s Palate is one of my favourite places. I won’t spoil the surprise, but the black and white line drawings in the restaurant REALLY come alive at night, and it’s a huge favourite with the guests (the food is amazing), and so the place will stay the same, but with a bit of sprucing up: state of the art new high-def flat screens, new animation, and updated characters too, including Disney-Pixar favourites.
One place that is going to change is Parrot Cay, the restaurant that provides buffet dining for breakfast and lunch, then a full service experience in the evening. It’s going to be an AMAZING new, much bigger restaurant called Carioca’s (I’ve seen the pictures, oh my goodness), with a South American theme. In the evening, it’ll be like dining al fresco in Rio. It’s gorgeous, with softly lit windows and amazing lanterns hanging from the ceiling.
Other bars and restaurants are being reimagined, and there’s a whole newly designed adult entertainment district called After Hours. Ooh, and a new Irish pub and sports bar called O’Gills! Lastly but not least, my favourite restaurant, Palo, will receive its own sprinkle of pixie dust, with new stone floors and glass artwork in keeping with its Venetian theme.
The Animator’s Palate - ENGLISH MUM
The Kids’ Clubs
When we were on the Disney Dream, I was really impressed by the kids’ club spaces. The Disney Magic is going to take on a lot of those ideas, and more besides. As you know, Marvel have now joined the Disney family and Marvel’s Avengers Academy, where the kids get to train to be a super hero through special missions, looks set to be fabulous, including Captain America’s shield and IRON MAN’S SUIT!!!:
The new Marvel’s Avengers Academy. Pic (c) Disney Cruise Line
My favourite new space by far, though, is going to be ‘Andy’s Room’, featuring a huge version of Andy’s bed, complete with a Slinky Dog slide and an enormous Mr Potato Head and everyone’s favourite piggy, Hamm.
Andy’s Room. Pic (c) Disney Cruise Line
There will also be a new It’s a Small World Nursery for the youngest cruisers aged 3 months to 3 years, and Pixie Hollow for all the little fans of Tinker Bell (sadly, I’m too old) where there is a COSTUME CLOSET (be still my beating heart) shaped like Tinker Bell’s teapot house. The cuteness! It burns!
The Spa
The already-gorgeous spa with incredible ocean views is being expanded and redesigned and will offer a special new Chill Spa especially for teenagers aged 13 to 17.
The Staterooms
All the staterooms will be getting their own reimagineering too, with more space made available by clever imagineering like elevating the beds to provide storage underneath and obviously all-new soft furnishings and bathrooms.
The new staterooms. Pic: (c) Disney Cruise Line
All this work will be completed in Cadiz by October 10th and then in 2014 the Magic will be heading back to join the Disney Dream and the Disney Fantasy in Port Canaveral, Florida (the Disney Wonder home ports in Miami).
And what’s all this going to cost? I hear you cry?
‘Just enough‘, says Frank, with a twinkle in his eye, ‘and not a dime more‘.
7-night Disney Magic Mediterranean Cruise from £949 per adult and £699 per child. Virgin Holidays Cruises offers seven nights onboard Disney Magic from Barcelona, calling at Villefranche (for Nice, France), Pisa, Rome and Naples, including flights from London Gatwick and transfers. Prices are per person based on two adults and two children travelling and sharing an inside cabin on a full-board basis. Based on a departure on 30 August 2014. Offer is subject to availability and includes all applicable taxes and fuel surcharges which are subject to change.
To book: Visit www.virginholidayscruises.co.uk, call 0844 573 4398 or visit one of our stores located in Debenhams and House of Fraser stores nationwide.
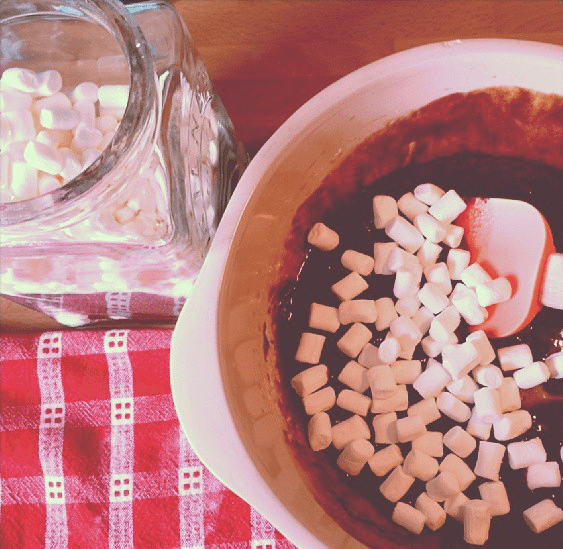
Regular readers will know that we’re HUGE chocolate brownie fans here at English Towers. I was desperate to get back in the kitchen and do some baking after being away for three weeks and we were all craving a batch of brownies. I chucked in a couple of handfuls of marshmallows and the result was rather pleasing. Because they’re quite airy, they rise to the top, which gives you a nice gooey marshmallowy layer on top of your squidgy brownie. The tops of the little marshmallows also brown which gives a little crispness to each bite. They’re not the prettiest looking brownies but hey, you can’t have everything!
Here’s my tried and tested brownie recipe. See what you think:
How to make chocolate brownies:
You will need:
200g dark chocolate
170g salted butter (or add a pinch of salt if using unsalted)
3 free range eggs (room temperature is always better)
200g soft brown sugar (caster is fine if you don’t have any)
110g plain flour
About two large handfuls of small marshmallows
So firstly, assemble all your ingredients together, and preheat the oven to gas 4/180 degrees.
The method
Step one: melt the butter and chocolate in a bain-marie - basically, a heatproof bowl (so not a plastic one) over a saucepan of just-simmering water – don’t let the bottom of the bowl come into contact with water. Turn the water off when it’s just bubbling and stir the mixture gently until it’s combined. Take it off the heat and allow to cool to room temperature (if you pour very hot chocolate into the eggy mixture, you risk getting blobs of scrambled egg in your brownies. Ick).
Step two: meanwhile, whisk the eggs and sugar together until pale, light and frothy. There is no raising agent in brownies, so the air whisked in at this stage will stop them being a big chocolate brick.
Step three: pour in the cooled chocolate/butter mixture and stir well.
Step four: lastly, add in the flour and the marshmallows.. Stir briefly until the flour disappears. Less is more here.
Baking
I use a square silicone cake ‘tin’, given a little spritz of cake release spray, but any square or rectangular tin will do. Make sure you line it very well as the brownies will stick.
Step five: bake for about 30 - 40 minutes or until the top is cracked and shiny. The centre should still be slightly soft and squidgy.
Leave to cool a little bit before slicing.
We also thought that maybe if you added little bits of digestive biscuit (Graham crackers, I believe if you’re in the US), they would almost be like s’mores. Yum.
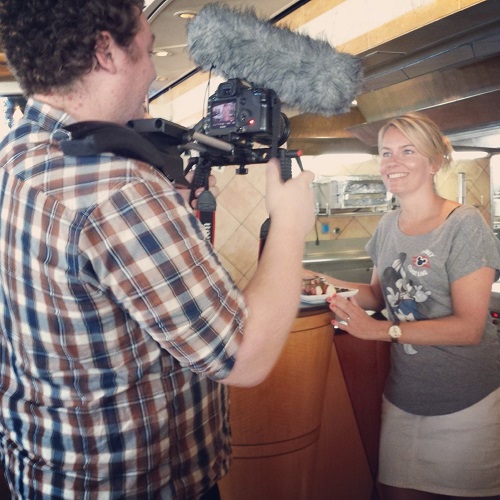
One of my favourite moments aboard the Disney Magic was when I had the amazing opportunity for a one to one masterclass with the Executive Chef of the fine dining restaurant, Palo. Here I am (below, with lovely Jamie the cameraman - he works on the X Factor you know) doing my piece to camera VERY BADLY. Palo was my favourite restaurant aboard the Disney Dream, so I was really excited to see how the Palo on the Magic stacked up. Luckily the experience was just as incredible, and, with the film crew (film coming soon!), I got to see how Chef made his famous seared tuna with a potato risotto.
The Chef’s version was obviously much more complicated, with shaved truffles, artichokes and a beautiful veal reduction. However, he did tell me how to cook the creamy potato risotto and the wonderful seared tuna:
Potato Risotto (serves 4)
1kg waxy potatoes
Butter
1 fat clove garlic, grated
500ml stock (chicken or fish is fine)
Dash of double cream
So firstly, peel all the potatoes and chop them into about 2 cm cubes. It’s a bit laborious but well worth the effort (as you can see, mine weren’t very uniform - I’m terribly sloppy in the kitchen - what would Chef say?). As you chop them, pop them into a bowl of salted water so they don’t discolour. Heat a large knob of butter in a large, heavy frying pan and fry the garlic for a minute or so, then add in the potatoes. Stir well to cover them in the garlicky butter, then pour in the stock.
Bring to the boil and then reduce the heat and allow the potatoes to simmer very gently for about 15 minutes until just tender. Pour in a dash of double cream, stirring gently so you don’t break up the potatoes, and season to taste. Keep warm while you quickly sear the tuna.
Seared Tuna
Bring four decent sized tuna steaks, trimmed of any sinewy bits, to room temperature. Rub the tuna with a little oil and then season with salt and pepper. Heat a frying pan until it’s really hot, then fry the tuna steaks so that they’re golden on the outside but still retaining some pinkness in the middle.
Serve immediately on the potato risotto. Drizzle with a little truffle oil if liked.
So after three weeks of back to back holidays, I have a huge amount to write, but I’m taking my time, settling back home, attacking the Giant Washing Mountain of Buckinghamshire, and doing a bit of nesting.
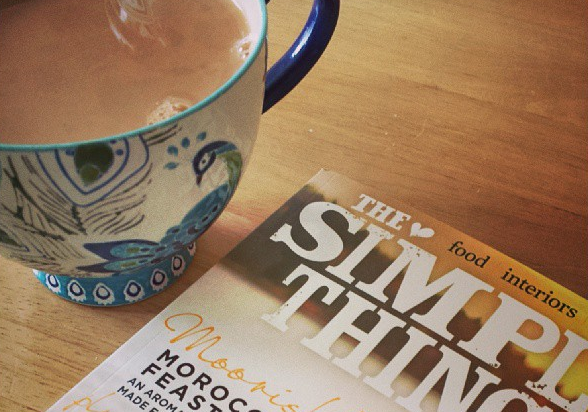
I love our house and, although I’ve loved every minute of gallivanting about on the med, it’s just been wonderful to come back to English Towers, find my slippers (although one was populated by a spider of epic proportions that prompted much hopping about and squealing), dig out my jimjams and kick back with a cuppa and a magazine. I’m having a bit of a magazine crisis at the moment. I’ve gone off my old favourite so I’ve been buying a few different ones to try them out. This one is really good. One of my Instagram friends described it as a ‘lovely cosy warm jumper’
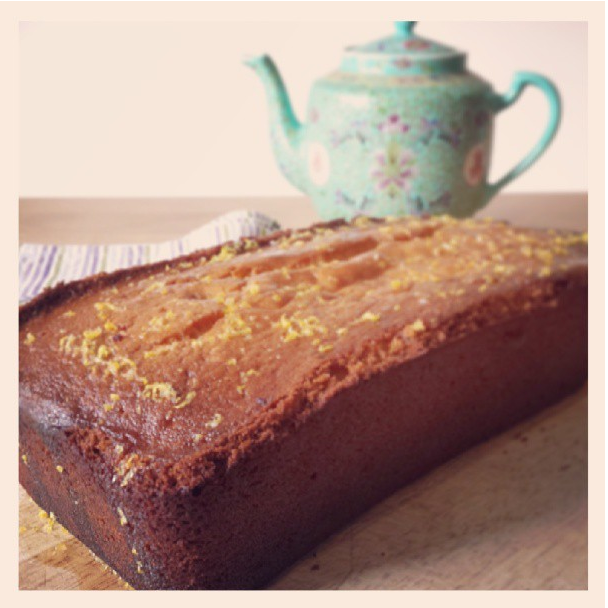
But most of all it’s been lovely to get back in the kitchen and baking again. On Sunday, we had a Moroccan chicken pilaf (an easy, one-pot wonder) and then lemon drizzle cake (which seemed somewhat apt as we sat at the table and watched the drizzle in the garden):
Lemon Drizzle Cake
170g butter
170g golden caster sugar
170g self raising flour
3 large free range eggs (duck eggs are fab for baking if you can find them)
2 large unwaxed lemons
2 tbsp icing sugar, sifted
So it starts off just as a normal ‘pound cake’ really. Weigh everything out first, then cream the butter and the sugar until it’s really pale (preferably with an electric whisk - this should be really light).
Break the eggs into a bowl and add the juice and finely grated rind of one of the lemons, then it’s easy to just dribble it into the butter and sugar mixture, beating all the time.
If, when adding the eggs, the mixture starts to curdle, just add a tablespoon of the flour - this will bring it back together. Now stir in the flour until it’s just combined.
Pour into a buttered loaf tin and bake at 180 degrees/gas 4 for about 30 - 40 minutes. Check to see if it’s done by popping a skewer into the centre. It should come out clean. If not, put it back in for 5 minutes.
Bring it out of the oven. Put the zest and juice of the second lemon into a bowl and whisk in your sifted icing sugar, then carefully take the cake out of the tin and spoon the lemony liquid all over the top of the cake. Serve at once with lots of cream or ice cream. Or leave to cool and scoff with a cup of tea. Either way, it’s divine.
This is absolutely adorable. The lovely chaps at Love Home Swap have created this frankly AMAZING cheat sheet, with 50 holiday activities for kids. I’m biased, I know, but my favourite is ‘broadcast your holiday with a blog’. You’re never too young to start blogging!
Massive thanks to Love Home Swap for sharing this with me!
Wherever you go on holiday next, you’re going to need plenty of things to keep your children entertained. Here are 50 fun-filled activities you can pull out of your sleeve for a truly magic break away from home.
Play crazy beach ball games
Try juggling challenges
Hold a hacky sack tournament
Have a rock skimming contest
Create your own summer beach Olympics
Roll and tumble down sand dunes
Build your own obstacle courses
Collect fascinating sea shells
Make sandcastles, sand sculptures or just dig the deepest hole
Enjoy wet and wild water balloons or water pistol fights
Find incredible creatures bug hunting or rock pooling
Be a star making and editing a movie
Go round the bend on a rollercoaster
Test your creative and detective skills with an A to Z scavenger hunt
Get all aeronautical with a paper aeroplane flying challenge
Be the tour guide for the day
Amuse yourself at museums
Go wild on a whale watching trip or at a zoo
Get back on track on a mystery train ride
Take a bike ride through or out of town
Organise a dive-off at the pool
Try snorkelling and see another world under water
Ride the waves body surfing
Play last man standing on the lilo
Go ‘who will catch tonight’s tea?’ fishing
Enjoy the wacky world of wakeboarding
Spend a day sailing on the ocean waves
Go canoeing down a lake or paddle out to sea
Get wild with white water rafting
Grab a board and hit the surf
Navigate a hike using a map and compass
Feel the breeze abseiling
Play ‘who can climb the highest tree?’
Get a head for heights bouldering
See what you can find geocaching
Swoop and dive with a stunt kite
Glide gracefully or fall foolishly on roller blades
Play the great skip-off
Enjoy frisbee fun and frolics
Saddle up and ride your pony!
Enjoy your own bargain hunt and go to a flea market
See a movie in a foreign language
Knock them all down bowling
Tell your own story with a scrapbook of holiday adventures
Broadcast your holiday with a blog
Escape the weather by exploring caves
Spot the strangest fruits at a local market
See how the other half play at a local sporting event
Make stunning holiday cards with beautiful flowers you’ve pressed
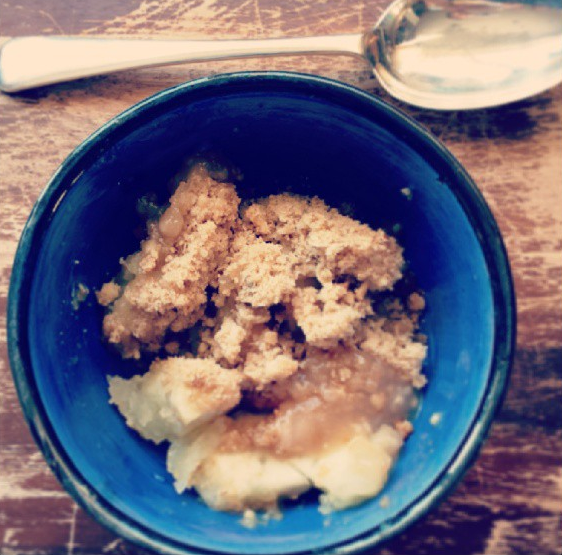
My Dad and his wife have a beautiful garden at their lovely bungalow tucked away down a leafy lane in Hertfordshire. The garden is centred around a wide piece of lawn, is completely enclosed and private and has the most wonderful flowers and fruit trees. We were walking around talking about his plans for the strawberry and raspberry beds (dig them up and start again - apparently they only last a certain amount of years) and discussing the fact that all the plums on the tree this year have little worms in them (I tested this - they do. Ugh) when we came across the big old apple tree which is GROANING with huge apples. I obviously offered to relieve him of some of the glut (I’m all heart), and we arrived home with his strimmer, hedge cutter and a huge bag of apples!
Even though it was still quite warm, we decided that apple crumble was the only way to go. Here’s how I made it. I like oats in my crumble and crunchy brown sugar, but personalise it however you see fit, maybe add sultanas or cinnamon in with the apple, or sprinkle the finished crumble with slivers of almond.
For the apples:
6 or 7 Bramley apples (my Dad’s apples aren’t Bramleys, but seem similar)
Big splosh of apple juice or water (say 100ml?)
2 tbsp brown sugar
For the crumble:
175g plain flour
125g butter
125g brown sugar (I use Demarara)
25g porridge oats
Preheat the oven to gas 6/200 degrees.
To prepare the apples, just peel and core them, then slice them into smallish chunks. While I’m doing it, I pop them into a bowl of salted water to stop them going brown. When they’re all done, drain them and put them into your pie dish. Sprinkle over the couple of tablespoons of sugar and pour over the liquid (water is fine). Give them a quick stir to distribute the sugar.
For the crumble: rub the butter and flour together (not too fine - a lumpy texture is better), then stir in the sugar and porridge oats. Cover the apples with the crumble and bake for about 30 minutes. Serve with double cream or custard. Oh, and you can’t beat a cold bowl of crumble with yoghurt for breakfast either. Yummy.
I’m massively into stationery. It may be old fashioned, but you can’t beat a lovely handwritten thank you card, and I always make sure I nag the boys to send thank yous after Christmas too.
I thought these were really lovely. A little company called PaperShaker asked if I’d like to have a go at making some cards and these gorgeous glossy beauties arrived today. They’ll be perfect for saying thank you. All you have to do is pick a card (it doesn’t matter if it’s a weddingy one or whatever, just look for the design you like - I chose this quite plain one), then customise it with your own photos and words. I picked the logo designed for me by the VERY clever designer of this site, the lovely Andy, then added it to the card. The next day I received this gorgeous bunch of cards, complete with envelopes. EXCITING! I thought it would be especially lovely to do a photo of the kids and put it onto a thank you card, or what about a cake one for birthday cards? The possibilities are endless…
Do have a look - they do all sorts of birth announcement cards, wedding cards, invitations, baby announcements, whatever you like, all lovely quality and customiseable too. I’m delighted with mine!
Because I loved them so much, they’ve offered me a special deal. If you order with them and use the reader offer code: ENGMUM at the checkout, you’ll get 25% off your order too! (code is valid until 6th October) - so what are you waiting for? Get designing!
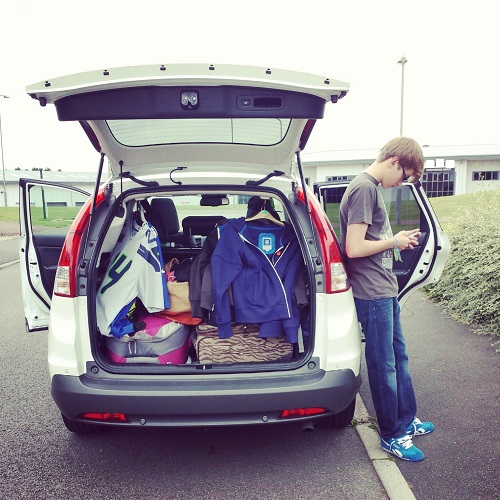
With our holiday to Brittany booked at the end of last year, we started to look around at transport options to get us there. I’m not a fan of ferry travel, being a bit of a puker, and flights meant that we would have had to hire a car - quite an expensive option. In the end, we settled for a MyFerryLink transfer from Dover to Calais (fast and efficient, and with crossings starting at £30 a very reasonably priced choice - they also have a very large shopping boutique online, which pleased me). Honda then stepped in and offered to lend us one of their new CR-V diesel 4WD cars for the holiday, which pleased me even more.
Before we start
As usual with our car reviews, I’m not Jeremy Clarkson so there won’t be much stuff about drag coefficients or torque, but if you’re choosing a car and considering the Honda, we’ll tell you what we liked and what we didn’t like. What was fun and what wasn’t. Simples.
First impressions
The Honda is a lovely looking car. There’s something about the lights that make it look like it has wide eyes with long lashes (or is that just me?). We loved the pearlescent paint and it looked roomy enough to accommodate us and our luggage. We were lucky enough to have the highest spec EX version with some really handy extras - more of those later, but for now, we were packed and ready to go…
What we liked
With a 500 mile slog ahead of us, we were happy to find that the seats were really comfy. The boot is huge (589 litres, whatever that means) and the rear seats fold down with a single pull of a lever. Handy. There are tons of cupholders and storage spaces
The keyless access (available with the EX - you just keep the fob in your pocket) is really clever and there’s just a push button to start. You can also open and close the windows with it (a great show off trick).
The integrated Sat Nav with turn by turn function (also standard on the EX) was great and worked well in France, although we felt it was slow on roundabouts and until we got used to it there was some confusion about which exit to take.
The rear parking video display is amazing - once you’ve worked out which line is which, parking is effortless (although Mr English missed his ‘beep beep’ reversing sensor).
With an average 43mpg on our journey we managed Calais to Brittany on one tank, which was really impressive and fabulous for the lazy amongst us who hate filling up. There’s also an eco function that has a green light on the dash which shows you when you’re driving in the most economic manner.
The stereo was fabulous, and with loads of connections in the central arm rest (USB/AUX etc) everyone could have turns at being a DJ. You can also connect your phone via BlueTooth.
The aircon is fantastic and very efficient, causing loads of arguments as I hate having freezing cold air blowing on me, but the rest of the family love it. The boys had their own aircon vents in the back.
We took the Honda to the beach on a regular basis and found the boot liner so handy. When we got back to the villa we just unpacked and then removed the liner to shake off all the sand. I should imagine it’s wonderful for dogs and muddy football boots too. The boot lid closes with one touch of a button which we loved. You can also open and close it from the driver’s seat and the fob (and yes, it stops closing if you put your head in it - we tested it with Charlie’s head).
The EX also had a spectacular panoramic glass roof which made the whole car feel really light and airy, although you can close it on a hot day when the sun’s really beating down to keep the interior cooler.
What we didn’t like
In our usual slap dash style, we omitted to read the manual and a few things took some getting used to, like every time the driver got out of the car, the seat went back, then you had to push your pre-programmed button to put it back into position. We’re not sure if it’s always like that (to allow easy exit and entry) or if we were doing something wrong.
We also worried that we were scratching the hard plastic on the door by putting the key fob in there every time. It’s probably better kept somewhere else.
The verdict
What a fab car. We all loved it and felt quite sad to see it go after sharing a couple of weeks and over a thousand miles together. We thought it looked beautiful and was really functional as a family car (and boy, did we test it). The Honda is built in Swindon too.
A word of warning though: do read the instruction manual. It took us 8 hours to do the drive from Calais to Brittany as we had inadvertently got the Sat Nav set to avoid toll roads. It was 2 hours quicker on the way back.
The vehicle we tested was the Honda CR-V 2.2i-Dtec EX 4WD manual in White Orchid Pearl, OTR £30,995 or £31,495 with the pearlescent paint.
Massive thanks to Honda (UK) for their generosity, patience and time. You can find more information on the Honda CR-V here.
Check out these CUTE little fridge magnets that the lovely bunch at Stickygram sent me. Aren’t they gorgeous?
Basically you just log on to stickygram.com and connect your Instagram account, then you can select 9 pictures and they send you them as magnets. Mine came the next day and I love them - a constant reminder of our wonderful Disney cruise.
So the first alarm of the new term woke me up this morning. It’s been quite a few weeks since I’ve had to get up and it was a bit of a struggle, believe me! Still, the boys both have important years: Sam’s doing his A2s and Charlie is doing his GCSEs so they’re both quite hyped for the new school year.
Since the boys are heading back to school, I did wonder whether I might join them. I’m an enthusiastic cook, and pretty confident, but there’s always plenty of new things to learn and I’ve been looking into cookery classes in London to see what there is available. I’m really tempted to do a bread baking course, and maybe book myself onto a wine course too - I’m desperate to gain a bit more wine knowledge as myself and the Hubby are heading off on a wine cruise in October!
I’m lucky because I work for myself, so I can get away in the week, but even if you work all week, there seem to be quite a few cooking classes on the weekend available too - a lot of the Saturday wine courses include lunch and food-matching tips, which I thought was a lovely way to spend a day.
Still, if all else fails and you really have no time at all, you can sign up for online cooking classes, believe it or not, with lessons being delivered via video. There’s an Indian cookery course that looks really good.
So what do you think? Are you too old to go back to school or would you consider striding out into the world of education once more? At least there are no school dinners at our age!
Despite its Gothic looks, Nutfield Priory has never actually been a church, monastery or anything similar. The beautiful building was originally built in the late 19th century in the style of the Palace of Westminster by Member of Parliament Joshua Fielden as his private home. Over the years, it’s been commandeered for military use (during WW2) and has been used as a school too. It’s now a very beautiful hotel, full of original features including stunning stained glass, huge marble fireplaces and intricately carved woodwork.
The hotel, now part of Handpicked Hotels, sits in an incredible location, just near Redhill in Surrey and is an easy drive from the M25. I won’t lie, parts of the hotel are, well, let’s say faded. Some of the battleship grey corridors are a bit uninspiring, but I think that comes with the territory when converting a very old building. The main areas of the hotel are utterly beautiful and filled with glorious pieces of art (I was mesmerised by the painting of the beautiful woman on the main staircase) and, in the case of the magnificent Great Hall, a two-storey organ that apparently still works.
Our room was quite small but had obviously recently been refurbished, with a huge bed, enormous flat screen tv and marble bathroom. No noise from neighbouring rooms at all on either side, which is always a plus (I hate it when you can hear every time they flush their loo!). It was a beautiful sunny day so we dumped our bags and headed out on the stunning terrace to enjoy the view (the hills roll away and you can see Gatwick airport and beyond) and stuff ourselves with the most amazing sandwiches (share a portion, they really are enormous) and some particularly good triple cooked chips.
After our lunch, we wandered to the spa, which is in a separate, modern building just a short walk away, where Mr English headed to the pool and I had my very favourite Elemis facial, the Tri-Enzyme Booster facial - the one where it feels like your face is being dolloped with freezing cold custard, then you get to enjoy a phenomenal head, neck and shoulder massage before the therapist peels off the custard which has magically set into a masque (I’m sure Elemis would take issue with some of my technical terms, but you get the gist). The spa is lovely, with a huge, beautifully furnished lounge/waiting area with refreshments and lots of very well equipped therapy rooms. I have it on good authority that the fitness centre and pool is very good too.
After a lovely walk and a wallow in the bath (me) and a bit of telly (him), we wandered to the bar for a pre-dinner cocktail. The Nutfield Signature Cocktail is a delicious mix of Nutfield marmalade, Tanqueray and Triple Sec and isn’t remotely marmalade-like. I’d highly recommend it.
The Cloisters restaurant was once an open aired gallery area, now with an amazing wooden vaulted ceiling and tables looking out over the terrace and taking in that fantastic view.
The staff absolutely make the place - from Paddy in the bar to the lovely restaurant staff, everyone is friendly, happy and can’t do enough to make your stay enjoyable. I sent them into a panic when I didn’t like my starter (totally my fault, I didn’t realised the Asian poached pollock would be chilled and cold fish just isn’t really my thing) - it took us ages to convince them that we were fine and they didn’t need to bring me something else! We ate a delicious meal (£38 for three courses) with a very nice bottle of Spanish Bobal de SanJuan rosé. My fillet of Devon hake with basil and parmesan, pine nut quinoa, shaved radish and fennel was to die for - beautifully seasoned, artfully presented and cooked to perfection and Mr English’s pan fried whole Cornish sole was perfectly cooked and delicious. Desserts were small but delicious, and little works of art on the plate.
We liked: beautiful public areas, gorgeous terrace, friendly staff, heavenly triple cooked chips
We didn’t like: plug socket nowhere near a mirror (difficult to blow dry one’s hair, dahling). Breakfast was okay but nowhere near in the same league as dinner - requests for well done eggs/crispy bacon didn’t filter through (picky, I know, but that’s really all I’ve got).
Great for: romantic weekends away, gorgeous weddings, girly spa breaks
Top tip: book a room overlooking the terrace - from having a nose while walking around, they seem to be a bit bigger.


 As you probably know, we’re all serious chocoholics here at English Towers. Our latest obsession is the very peculiar range of Marvellous Creations bars (the Cola Pretzel Honeycomb one is ridiculously good). Imagine our delight, then, when a delivery of new Cadbury Dairy Milk Pebbles arrived on the doorstep! They’re yummy - think a combination of Cadbury Mini Eggs and Smarties (sorry, not Cadbury!) and you’re about there. But because they’re absolutely nothing to do with Easter you can eat them ALL YEAR ROUND! I’ve also recently seen glimpses of a special edition Winter Wonderland bar with milk and white chocolate trees. Yum.


")


 Despite its Gothic looks, Nutfield Priory has never actually been a church, monastery or anything similar. The beautiful building was originally built in the late 19th century in the style of the Palace of Westminster by Member of Parliament Joshua Fielden as his private home. Over the years, it’s been commandeered for military use (during WW2) and has been used as a school too. It’s now a very beautiful hotel, full of original features including stunning stained glass, huge marble fireplaces and intricately carved woodwork.
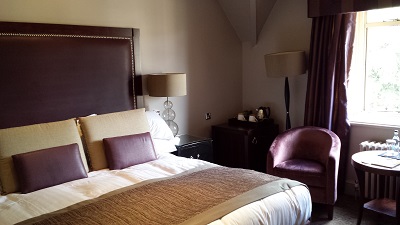
 After a lovely walk and a wallow in the bath (me) and a bit of telly (him), we wandered to the bar for a pre-dinner cocktail. The Nutfield Signature Cocktail is a delicious mix of Nutfield marmalade, Tanqueray and Triple Sec and isn’t remotely marmalade-like. I’d highly recommend it.
